Following these steps will help you mark out the correct size of a rounders pitch. Check out the rounders pitch dimensions and square size for batters and bowlers.
ROUNDERS FIELD: You will need nominal equipment for marking out a rounders pitch. This guide helps to make it a quick and easy process. You will need:
4 x pegs and a line marker.
1 x string 24 meters long with the center point marked at 12 meters (tie a knot).
1 x string 17 meters long with the center point marked at 8.5 meters (tie a knot).
Mark off a point 7.5 meter point from one end (use tape).
1 x string 2 meters long with the 1.25 meter point also marked (use tape).
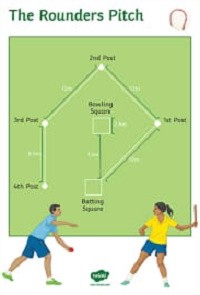
Rounders Pitch Measuring and Marking Out
These are the rounders equipment and boundary markings needed to play a game for recreation. Rounders pitch dimensions apply to the field playing surface as well as the perimeter line measurements and post positions.
But, England Rounders pitch dimensions must be accurately marked out. Team players can then apply their roles and positional responsibilities in the field. It also combines with rounders health and safety policies.
Begin marking out a rounders pitch layout by identifying where the batting square will be.
Place Peg 1 in the ground on the right hand front corner of the batting square.
Place Peg 2 directly opposite at a distance of 17m. This is the position of 2nd Post.
Mark the center of the front line of the bowling square at 7.5m as marked on the 17m string.
Rounders Pitch Dimensions and Layout
The bowling square can then get marked 1.25 meters both sides of the string and parallel to the front line of the batting square. Follow the next steps to get the correct rounders pitch size regulations.
Using the 24m string, tie one end to the 1st Peg, and the other to the 2nd Peg. Take the knot or marker (placed at the center point of 12m) and carry it to the right until the string is completely taut.
Place Peg 3 at the knot. This is the position of 1st Base.
Carry the string out to the left and repeat the process placing Peg 4 at the knot. This is the position of 3rd Post.
Now, using the 17m string, place one end at Peg 4 (3rd Post) and the other at Peg 1 (the front right corner of the batting square).
Draw the string taut and mark the position of the knot at the center point (8.5m). This is the position of the 4th Post.
The front line of the batting square gets made by marking a line 2m towards the 4th Post. Ensure the line is parallel with the front line of the bowling square.
Next mark the remaining three sides of the batting square.
The front line of the batting square extends out either side of the batting square for at least 12m.
The area to the front of this line is the ‘forward area‘. The area behind it is the ‘backward area‘.
The backstop line is 1m behind the rear line of the Batting Square. The line extends 3m either side of the center point of the Batting Square and parallel to it. The backstop line is a total of 6m in length.
At least 10m behind the front line of the batting square, and 15m either side of the front right hand corner of the Batting Square lines of 2m in length, get marked for the waiting batsmen and the batsmen who are out.
The running track consists of a solid line extending from the front right hand corner of the Batting Square to the 1st Post.
The same line will extend past the first post for 2m.
Lines will also get marked between the 1st Post to the 2nd Post, then from the 2nd Post to the 3rd Post and finally between the 3rd and 4th Posts.
In each case the line will get extended for 2m beyond each post as shown in the rounders pitch diagram.
Note: According to codified England Rounders Rules and Regulations, all rounders pitch layout line markings should be white and 50mm wide.
Rounders Pitch Dimensions and Layout used in the United Kingdom